For those following the build and would like to check out the completed Sailfish puppet... head on over to my Etsy shop and take a look.
Tuesday, May 15, 2012
Monday, May 14, 2012
Sailfish Final Stages
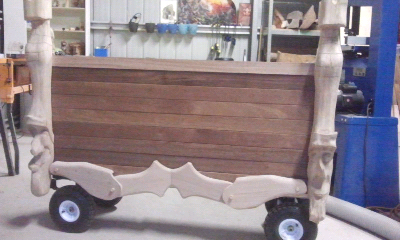
Well, with a new found ooomf...I decided it was time to get this sailfish puppet completed and prepared for "sale".
After getting the rigging sorted, I then had to prepare the sails.
It was a challenge to find appropriate material for the sails...and in fact, I ended up settling for a high quality, thread based paper.
I cut the sails and put in some rigging rope...


 I then had to prepare a groove in the tail to hold the "tie down" for the rear piece of rigging...
 For the "tie down" piece, I used a part I had obtained for model ship building...
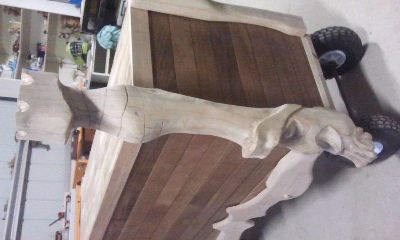
 It was now time to start thinking about the base-handle of the sailfish. After a look through my salvaged wood stockpile, I came across a small log of "redgum". As I looked at the form, I began to see how...by following the natural curve and grain in the wood...it could potentially make a great base for the puppet...
 With no markings or second thought, I rough cut the log...
 Then it was time to finely shape the piece and prepare it for the finishing...
 And before long, I had uncovered a great handle-base for the sailfish that was finished, polished and ready for mounting...
 A couple of carefully drilled holes later...and the sailfish was set in position...
 Once the brass rod connecting the fish to the handle was secured in position, it was time to "tie down" that back sail...
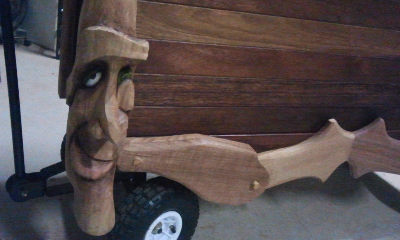
 And of cause...add in detail to the "window to the soul"...

After getting the rigging sorted, I then had to prepare the sails.
It was a challenge to find appropriate material for the sails...and in fact, I ended up settling for a high quality, thread based paper.
I cut the sails and put in some rigging rope...


Wednesday, May 9, 2012
Sailfish...Back in production
After a stint of not being able to continue the Sailfish due to other proects (such as the Loutky Tea Cart) taking priority...I am happy to say that it is time to get the sailfish completed!
But before I can announce that the puppet is done, there is some work needed.
Today, I was able to get stuck into painting the main detail in the face...

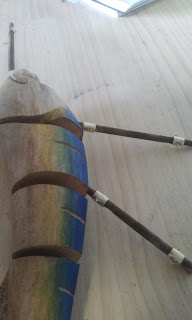
 And then the fun really began... Due to the fact that I want this puppet to resemble the feeling of an "old ship"...I decided it would be best to use genuine model ship parts for the rigging.
After studying some greatly crafted tall ships, I figured that I was set to "tie" my own rigging for the sailfish.
Let me say it now...Those guys who build those ships sure have some skill! Because it took me a while to work out how to rig the rope without it tangling up and causing all sorts of knots and twists.
Yes, yes...I know that this is not how the rigging actually goes...remember...this puppet is as much a work of art as it is a fish...all I needed to achieve was the aesthetic of a tallships rigging on the fish...

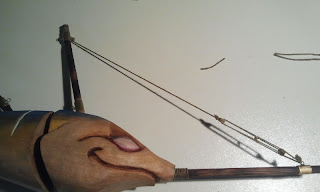
 Finally...success... The knots were tightened and things seemed to be working out great!
 Here is a pic of the rigging all set...
 And its not over yet...in the days ahead, I need to prep the sails and get them set on the fish as well...
What a learning curve this puppet has been!
Stay tuned as the completed puppet is ever so close!
But before I can announce that the puppet is done, there is some work needed.
Today, I was able to get stuck into painting the main detail in the face...


After studying some greatly crafted tall ships, I figured that I was set to "tie" my own rigging for the sailfish.
Let me say it now...Those guys who build those ships sure have some skill! Because it took me a while to work out how to rig the rope without it tangling up and causing all sorts of knots and twists.
Yes, yes...I know that this is not how the rigging actually goes...remember...this puppet is as much a work of art as it is a fish...all I needed to achieve was the aesthetic of a tallships rigging on the fish...


What a learning curve this puppet has been!
Stay tuned as the completed puppet is ever so close!
Sunday, April 22, 2012
Lotky Tea Cart COMPLETE
As "wallace" says to "Gromit"..."its amazing what a lick of paint will do..."
Indeed it is!
After sealing and painting using the techniques handed to me by Michaela Bartonova... i can now take a step back and proudly say "you are finnished!"
I cant wait to get the teapots onto this and crank it into action!
Thursday, April 19, 2012
Loutky tea cart
Its been a long time since posting...and for what im hoping is a good reason too!
over the last few months i've been away from the computer and in the workshop. This project has been a massive one, and rather than post the progressive nature of it... i figured it best to stick my head down...goggles on and get all those tools cranking!
so... here it is...with the help of some great friends...ive been able to get over the assembly hurdles (and there were many to come our way)... and i am now confident im on the down hill run to having it fully complete (minor detail painting and sealing finish to go).
100s of hours in production...
much sweat...blood and tears...
i give you...
the "loutky tea cart"!!!
Tuesday, March 27, 2012
Sail Fish cont'd...
Again more work has been done on this puppet.
Although Im still waiting for the initial coat of colours to dry, and have not been able to continue painting...there was plenty to go on with.
To begin with...I removed the Cane Toad leather from the clamps and cut the fins and tail to shape... Then I figured it was time to tackle the "masts" that will hold the "sails" as the main dorsal fin.
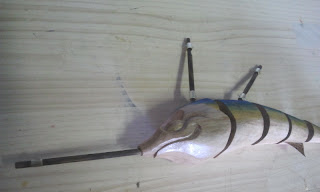
First step was to prep the lengths of dowel... Because I'm planning on having these masts look somewhat like an old sail ship with ropes and rigging, I figured I best go the full way and prepare some brass fittings and sailhooks... This meant getting rather technical and having to work in minute scale... Once the parts were cut and prepared...it was time to drill tiny holes into the brass and dowel to fit the tiny eyelet rings... This was way more time consuming than I first thought... but it was worth it...
 Then, I decided to push myself and rather than simply glue the eyelet rings in place, I would solder them. The issues was that because the eyelets went right through the wood...the brass had to be soldered whilst on the wood. This, naturally caused me to worry about the wood burning under the heat of the flame during the soldering process...And I wasnt surprised at the results...
 Rather than give up and start over, I thought there was the potential for a great sense of "age" on the burnt wood. I decided to continue...and took time to first clean up and polish the brass...then deliberately burn the rest of the mast...
The experiment worked brilliantly...and all three masts came out looking like they had seen many a year on the high seas... Then it was time for a test fit...of cause! So I carefully placed all three masts into position and....
 I cant wait to get this fish together and climb the rigging then set the sails!
Although Im still waiting for the initial coat of colours to dry, and have not been able to continue painting...there was plenty to go on with.
To begin with...I removed the Cane Toad leather from the clamps and cut the fins and tail to shape...
 Then I figured it was time to tackle the "masts" that will hold the "sails" as the main dorsal fin.
First step was to prep the lengths of dowel... Because I'm planning on having these masts look somewhat like an old sail ship with ropes and rigging, I figured I best go the full way and prepare some brass fittings and sailhooks... This meant getting rather technical and having to work in minute scale...
 Once the parts were cut and prepared...it was time to drill tiny holes into the brass and dowel to fit the tiny eyelet rings... This was way more time consuming than I first thought... but it was worth it...
 Then, I decided to push myself and rather than simply glue the eyelet rings in place, I would solder them. The issues was that because the eyelets went right through the wood...the brass had to be soldered whilst on the wood. This, naturally caused me to worry about the wood burning under the heat of the flame during the soldering process...And I wasnt surprised at the results...
 Rather than give up and start over, I thought there was the potential for a great sense of "age" on the burnt wood. I decided to continue...and took time to first clean up and polish the brass...then deliberately burn the rest of the mast...
The experiment worked brilliantly...and all three masts came out looking like they had seen many a year on the high seas...
 Then it was time for a test fit...of cause! So I carefully placed all three masts into position and....
 I cant wait to get this fish together and climb the rigging then set the sails!
Monday, March 26, 2012
Sail Fish cont'd...
There has been great progress on the Sail Fish Puppet.
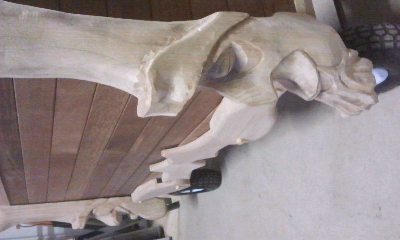
First was the need to reduce the rough grain on the wood. Ideally...hand chisels and knives would do the trick...but for this lump of wood, it simply wouldn't take it. So...it was time to get the Dremel and a special attachment to hone down the rough grain...
I always try to keep the sharp edges that are hand carved, as it adds to the overall character of the puppet...especially in the face. Now with the puppet looking great, it was time to hand carve in the "stripes" down the back of the fish.
 Then I needed to start thinking about the "mast" holes for the two sails that will act as the dorsal fin...
 And of cause...its time to segment the body...
 And with the head separated, I was able to add in a little depth for the gills...
 And then came the sealing of the pieces...
 It was at this stage that I began thinking about how I would be holding the segments together. I decided not to use my most common method - thick leather...and chose to experiment with the use of springs between each segment.
This choice then posed an interesting situation... what to do about the rear fins and tail as they are usually cut from the one spine piece of leather.
I decided to use "cane toad" leather! Yes...Cane Toad leather!
These toads are introduced pests in Australia and I don't think anyone in this country has any problem with the use of their skins! Besides... These critters have been responsible for way too much destruction in our country - I see it as artistic karma that the hides of such things be used to re-create a great creature of our waters!
 Although very thin...this leather is actually very tough yet very flexible.
I then glued to pieces back to back as I wanted the great natural pattern to be on both sides of the final shapes. So I glued it up and clamped it nice and flat. While the leather was drying in the clamps...I got to work on placing the springs.
I needed to use thin springs to allow the fish to be moved easily...but I knew that this then posed an issues for the segments to sag more than I would like. The solution I came up with was to use multiple springs in a row per segment.
At this stage, it looks as if the springs will work fine...but I am yet to know for sure as they sill need to be set in place.
 I then had to prepare the slots for the cane toad leather fins and tail...
 Now to slow down the heart rate, put on some music and start the painting process...
 There is still a lot of work to be done on the painting of this great fish. But I am very pleased with the progress so far.
First was the need to reduce the rough grain on the wood. Ideally...hand chisels and knives would do the trick...but for this lump of wood, it simply wouldn't take it. So...it was time to get the Dremel and a special attachment to hone down the rough grain...
I always try to keep the sharp edges that are hand carved, as it adds to the overall character of the puppet...especially in the face.
 Now with the puppet looking great, it was time to hand carve in the "stripes" down the back of the fish.
 Then I needed to start thinking about the "mast" holes for the two sails that will act as the dorsal fin...
 And of cause...its time to segment the body...
 And with the head separated, I was able to add in a little depth for the gills...
 And then came the sealing of the pieces...
 It was at this stage that I began thinking about how I would be holding the segments together. I decided not to use my most common method - thick leather...and chose to experiment with the use of springs between each segment.
This choice then posed an interesting situation... what to do about the rear fins and tail as they are usually cut from the one spine piece of leather.
I decided to use "cane toad" leather! Yes...Cane Toad leather!
These toads are introduced pests in Australia and I don't think anyone in this country has any problem with the use of their skins! Besides... These critters have been responsible for way too much destruction in our country - I see it as artistic karma that the hides of such things be used to re-create a great creature of our waters!
 Although very thin...this leather is actually very tough yet very flexible.
I then glued to pieces back to back as I wanted the great natural pattern to be on both sides of the final shapes. So I glued it up and clamped it nice and flat.
 While the leather was drying in the clamps...I got to work on placing the springs.
I needed to use thin springs to allow the fish to be moved easily...but I knew that this then posed an issues for the segments to sag more than I would like. The solution I came up with was to use multiple springs in a row per segment.
At this stage, it looks as if the springs will work fine...but I am yet to know for sure as they sill need to be set in place.
 I then had to prepare the slots for the cane toad leather fins and tail...
 Now to slow down the heart rate, put on some music and start the painting process...
 There is still a lot of work to be done on the painting of this great fish. But I am very pleased with the progress so far.
Saturday, March 24, 2012
Sail Fish - A NEW PUPPET
Once again, it came to pass that a new puppet be started.
During the building of the last puppet - the Murray River Princess - I sketched down a silly idea following a similar concept as the Big Cod...
And so...it was soon refined and in line as the new puppet to be created.
First things first...I had to find a good piece of wood.
As many of you know, I use salvaged Australian woods...this leads to many new challenges for a puppet carver to tackle. One thing I decided is that I wanted a light shade of wood for this puppet to help bring out the colour of the fish. Here is where I had my first challenge...as many of the woods I had gathered were dark in colour such as "rosewood" or "cedar"...even the "ironbark" I had was of the red variety! After looking high and low, I soon settled on a chunk of "greygum" and then it was clamped up and inspected as to where the puppet would come from within the wood. Heres where another challenge is faced. Australian Gum variety of woods are...well...HARD!
It wasnt a simple matter of putting the half log in the bandsaw...as my bandsaw is set up for fine cutting with a thin blade.
It was then when I remembered one of the great carvers I saw in Czech Republic...He did all his "blocking out" using a chainsaw.
So, it was out with the chainsaw to cut me a slab from the log. And what fun it was too!
 Now it was time to use the bandsaw and shape the slab...
 And once I had the rough block cut to shape...It was onto the challenge of rounding out the form. I always do my best to use the hand chisels for as much of the work as possible...and although I did in fact try to block out the form...it was not getting the results I needed due to the hardness and texture of the wood. So I grabbed the Arbortech Mini Grinder and went to work on the form...Although purists may scoff at using such tools, I cannot stress enough how great these work! They are an Australian product, made for working hard on woods like Australian Hardwoods!
 Now it was time to settle into what is known as "the rhythm" and begin on the facial features of the fish. For this task, hand carving tools were definitely the weapon of choice as they enable complete control in the details. Hand tools worked well here because the area was small, refined and required only small amounts carved at one time.

 Now if you know your fish, you will notice that this sail fish doesnt have the long pointy nose that they are renowned for. There are many reasons for this, but rather than give away the end result (although in one of the pictures you can get a glimpse of what direction it might be taking), I shall simply share that the following stages are in preparation for that very nose!

 And once more, I had to "clean up" around the face a little and add the eyelids...
 All up, it has been a very productive day on this puppet!
I will keep posting the progress, so be sure to check it out.
During the building of the last puppet - the Murray River Princess - I sketched down a silly idea following a similar concept as the Big Cod...
And so...it was soon refined and in line as the new puppet to be created.
First things first...I had to find a good piece of wood.
As many of you know, I use salvaged Australian woods...this leads to many new challenges for a puppet carver to tackle. One thing I decided is that I wanted a light shade of wood for this puppet to help bring out the colour of the fish. Here is where I had my first challenge...as many of the woods I had gathered were dark in colour such as "rosewood" or "cedar"...even the "ironbark" I had was of the red variety! After looking high and low, I soon settled on a chunk of "greygum" and then it was clamped up and inspected as to where the puppet would come from within the wood.
 Heres where another challenge is faced. Australian Gum variety of woods are...well...HARD!
It wasnt a simple matter of putting the half log in the bandsaw...as my bandsaw is set up for fine cutting with a thin blade.
It was then when I remembered one of the great carvers I saw in Czech Republic...He did all his "blocking out" using a chainsaw.
So, it was out with the chainsaw to cut me a slab from the log. And what fun it was too!
 Now it was time to use the bandsaw and shape the slab...
 And once I had the rough block cut to shape...It was onto the challenge of rounding out the form. I always do my best to use the hand chisels for as much of the work as possible...and although I did in fact try to block out the form...it was not getting the results I needed due to the hardness and texture of the wood. So I grabbed the Arbortech Mini Grinder and went to work on the form...Although purists may scoff at using such tools, I cannot stress enough how great these work! They are an Australian product, made for working hard on woods like Australian Hardwoods!
 Now it was time to settle into what is known as "the rhythm" and begin on the facial features of the fish. For this task, hand carving tools were definitely the weapon of choice as they enable complete control in the details. Hand tools worked well here because the area was small, refined and required only small amounts carved at one time.

 Now if you know your fish, you will notice that this sail fish doesnt have the long pointy nose that they are renowned for. There are many reasons for this, but rather than give away the end result (although in one of the pictures you can get a glimpse of what direction it might be taking), I shall simply share that the following stages are in preparation for that very nose!
 And once more, I had to "clean up" around the face a little and add the eyelids...
 All up, it has been a very productive day on this puppet!
I will keep posting the progress, so be sure to check it out.
Subscribe to:
Posts (Atom)